First 30 minutes with JUDDGES
A three-step tour for legal researchers logging in for the first time. By the end you will have searched the corpus, saved a research collection, and reviewed the base coding schema used across JUDDGES extraction pipelines.
In-app version: the live, clickable equivalent of this tutorial lives at
/onboardinginside the app. Both surfaces share the same screenshots, regenerated bynpm run docs:screens.
What you'll learn
flowchart LR
    A[Log in] --> B[Search]
    B --> C[Document]
    C --> D[Collection]
D --> E[Base coding schema]| Step | Goal | Time |
|---|---|---|
| 01 | Search the corpus with hybrid semantic + full-text ranking | ~8 min |
| 02 | Build a research collection | ~5 min |
| 03 | Read the base coding schema | ~7 min |
Prerequisites
- A JUDDGES account (request access at lukasz.augustyniak@pwr.edu.pl).
- A modern browser. Firefox, Chrome, Safari, and Edge all work.
- Optional: a sample search query or fact pattern from your research area. The tour works without one, but a real research question makes Step 01 much more illustrative.
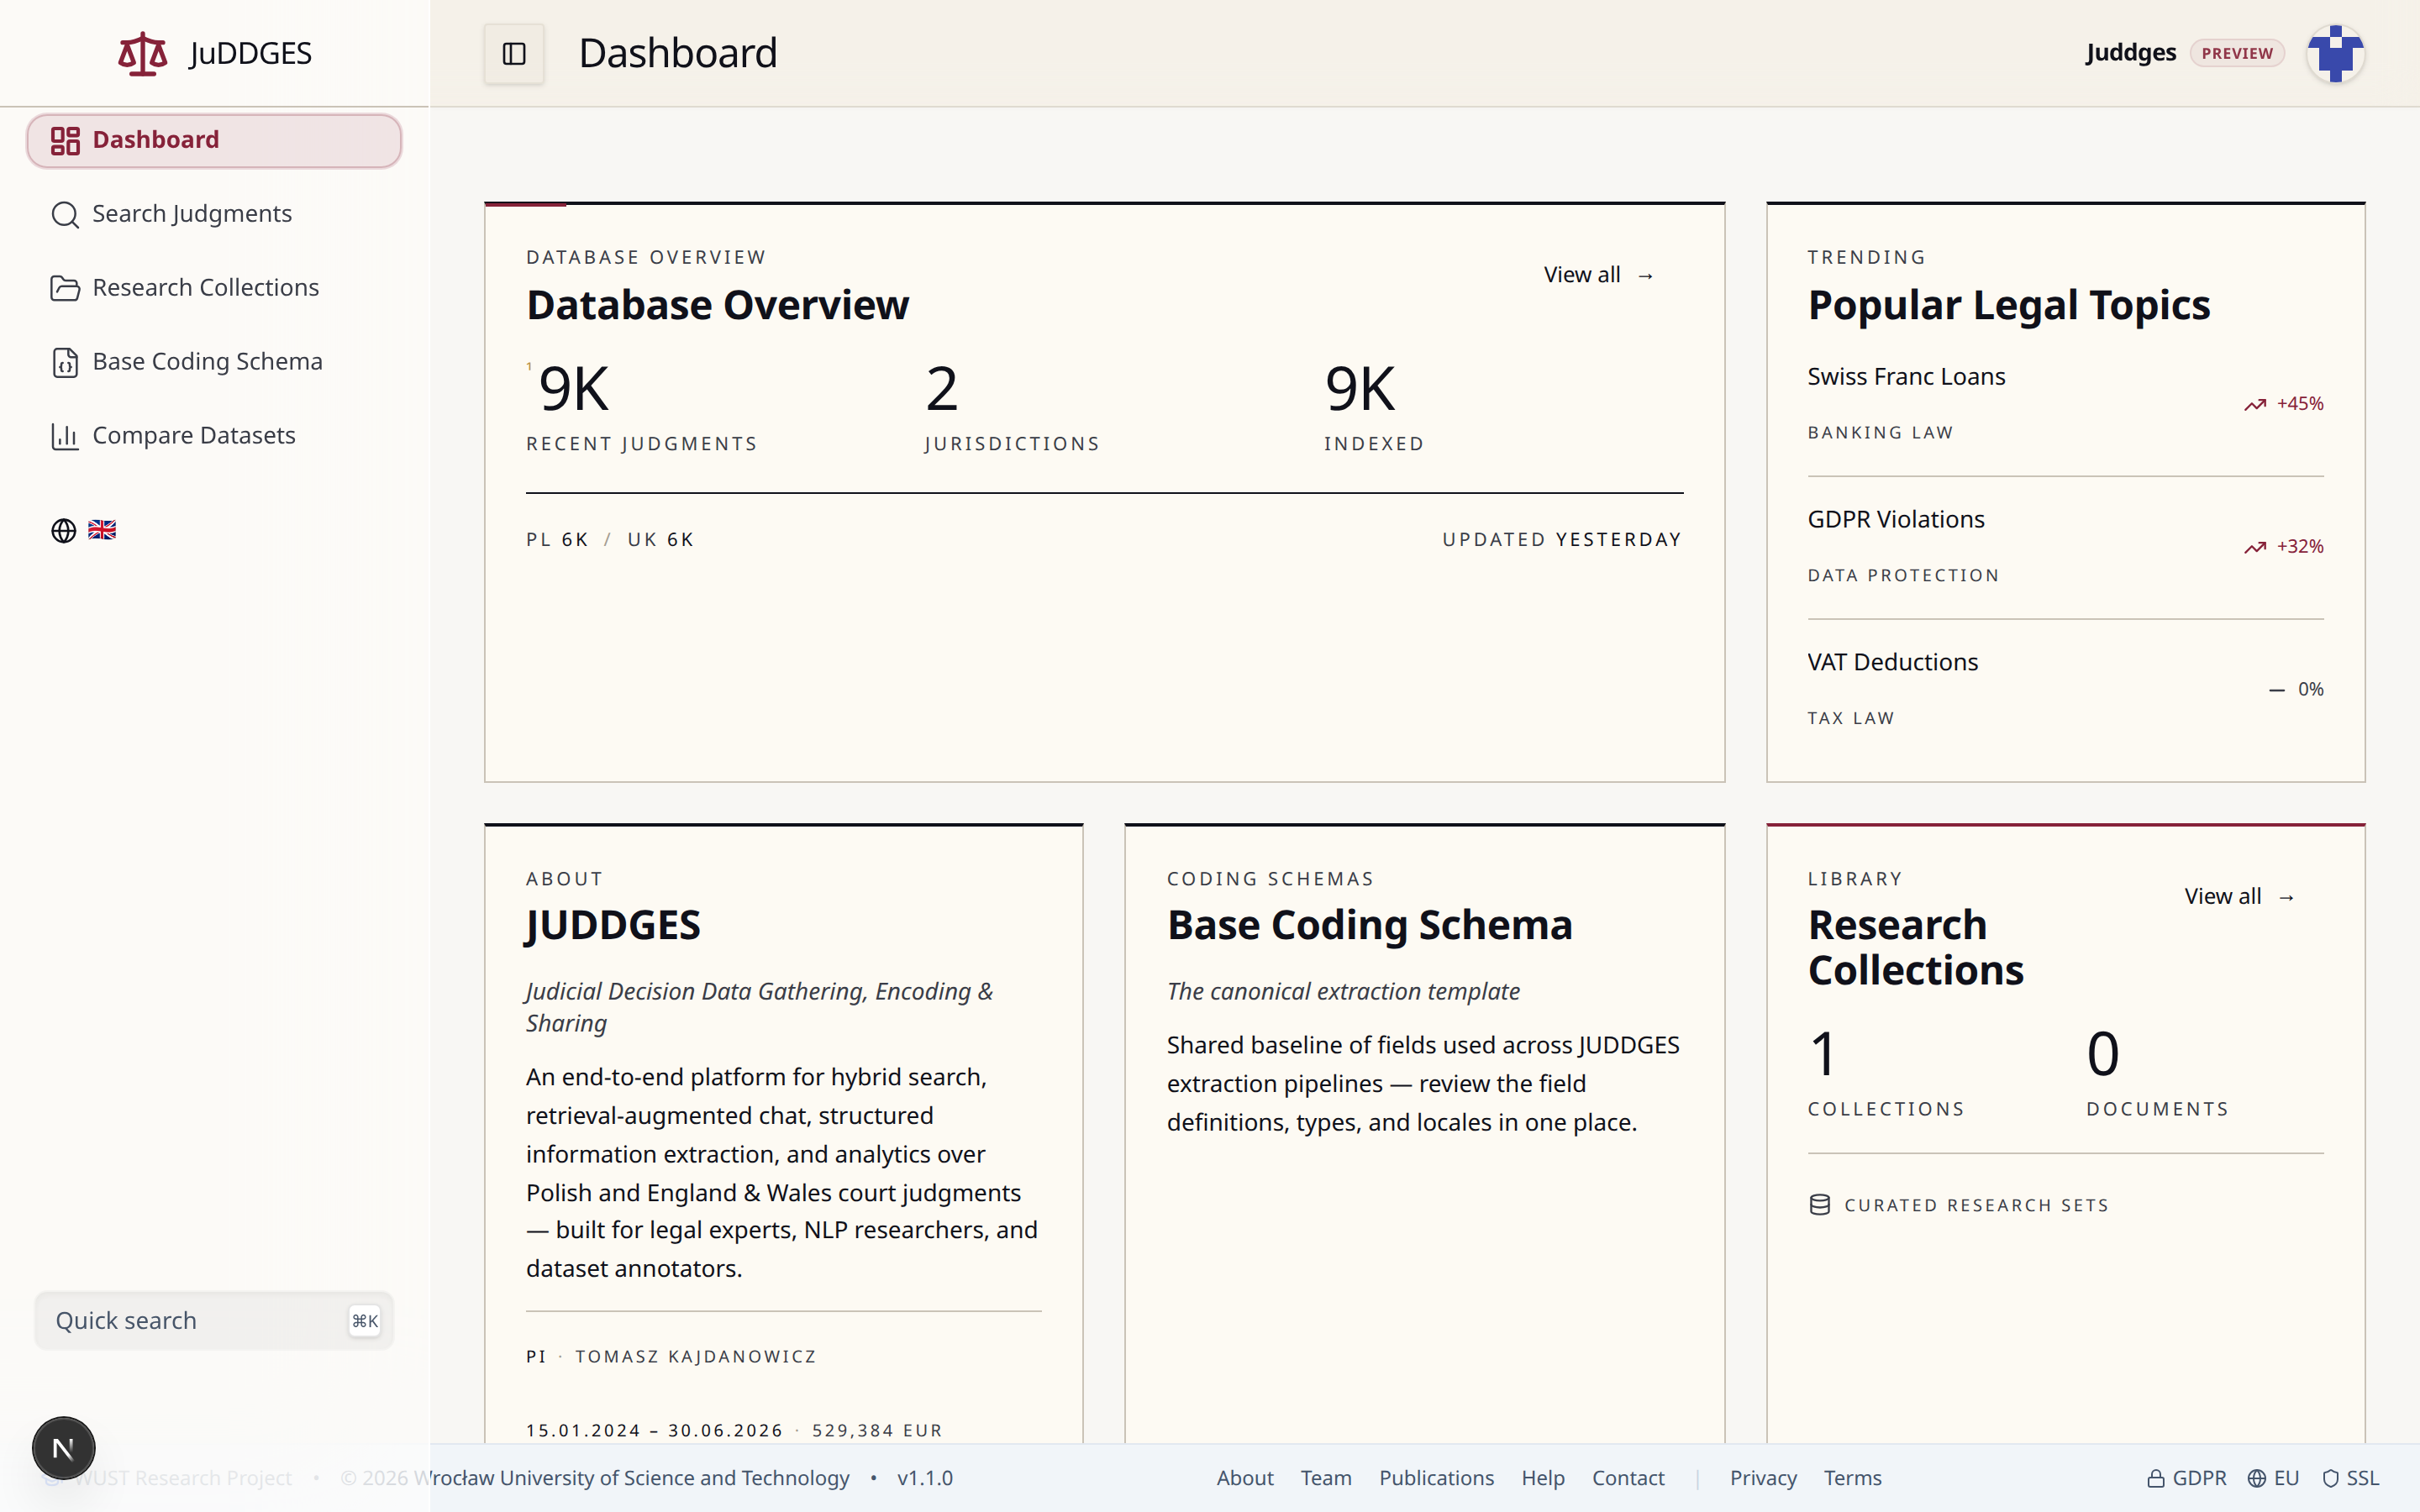
The dashboard is the home page after login. Below the headline statistics you'll see the entry points referenced throughout this tutorial.
Step 01 — Search the corpus
JUDDGES runs hybrid search: every query is scored against both a
semantic embedding index and a Postgres full-text index, then the two
rankings are blended. The practical consequence: you can phrase queries as
you would ask a colleague ("liability for breach of an employment
contract") rather than reverse-engineering keyword forms.
Walk through the example
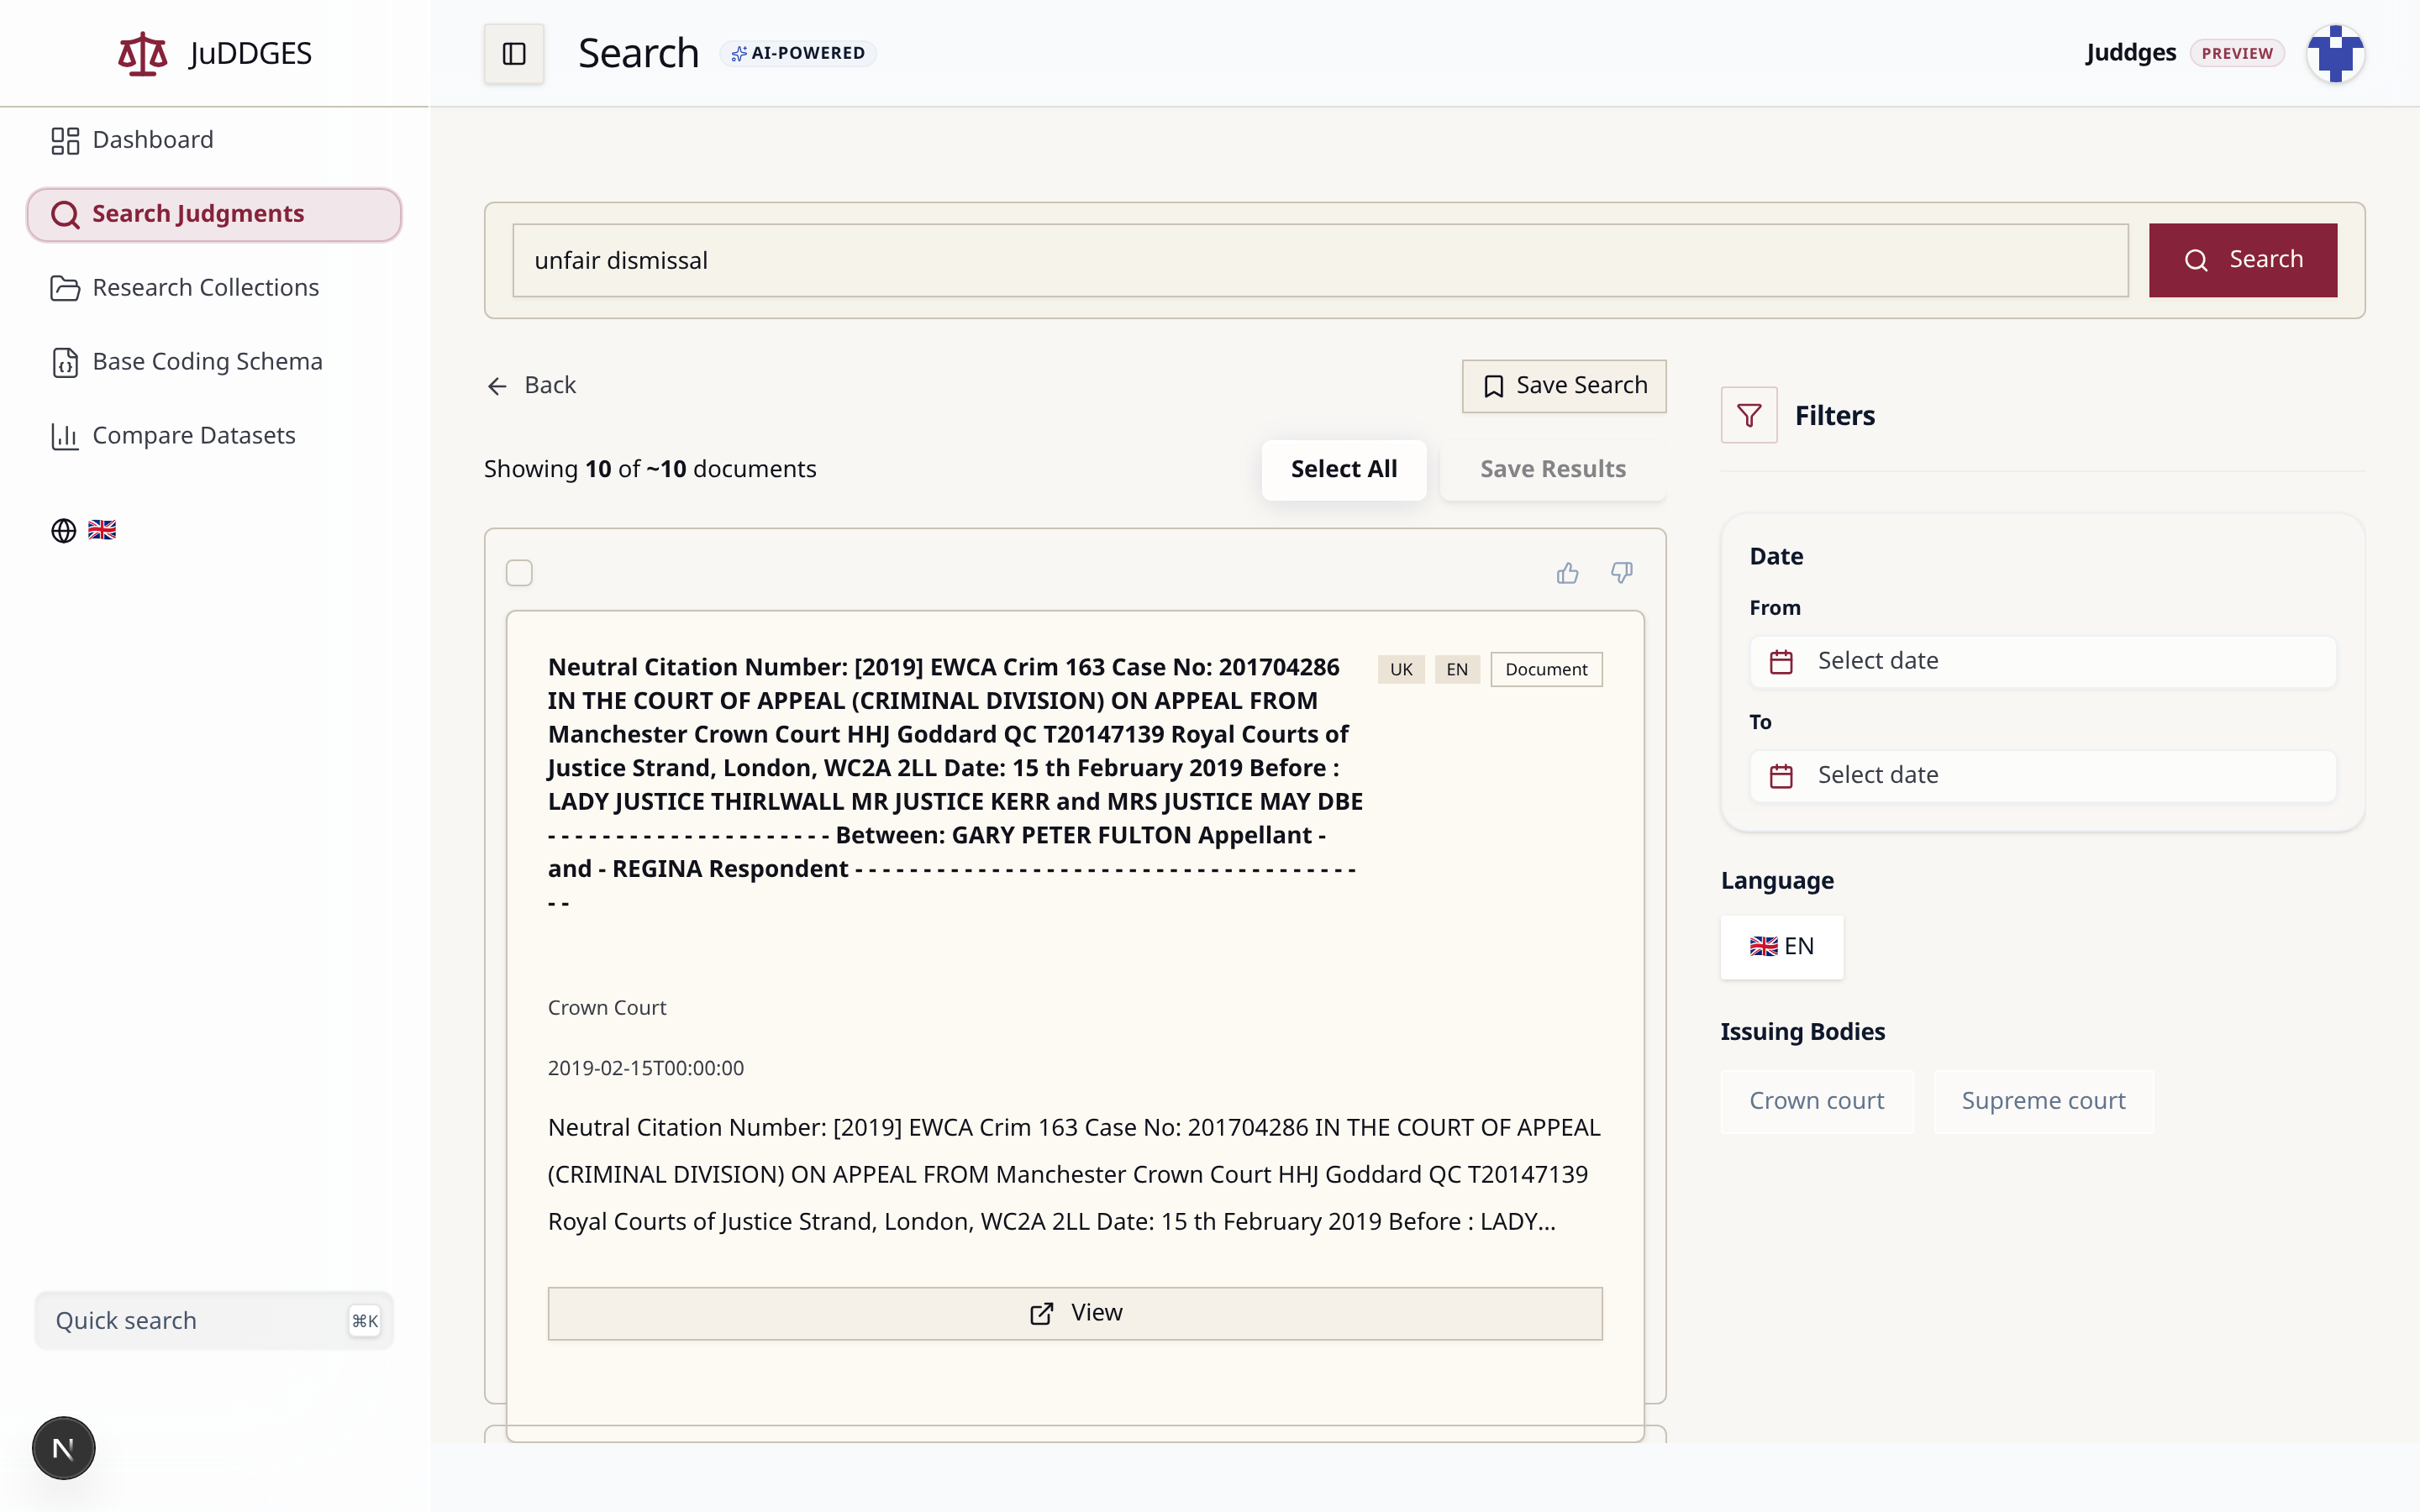
The screenshot above shows the result of searching for
unfair dismissal — try it yourself at
/search?q=unfair+dismissal.
- Read the query bar. Anything you type is run as a hybrid query by
default. The
AI-POWEREDbadge next to the page title indicates semantic ranking is active. - Scan the result card. Each result shows the jurisdiction (
UK), the document language (EN), and the document type (DocumentorJudgment) as small badges. The court and the publication date appear below the case identifier. - Open the filters panel. On the right you can constrain results by
Date range, Language, and Issuing Bodies (Crown Court,
Supreme Court, …). Filters compose with the query — the result count
in
Showing X of ~N documentsupdates as you adjust them. - Save the search. The
Save Searchbutton (top right) persists the query + filters as a Saved Search, accessible from the left sidebar. - Open a judgment. Click
Viewon any card to read the full text with cited legislation and AI-extracted highlights surfaced as a side panel.
Tips for legal-research queries
- Concept first, keyword second. Semantic ranking rewards conceptual
phrasing.
"compensation for breach of fiduciary duty"beats"breach fiduciary". - Mix English and Polish. The query is matched against both locales — use whichever language your fact pattern lives in.
- Use the jurisdiction filter early. Comparative research benefits from running the same query under PL and UK filters separately, then using collections (Step 02) to assemble the comparison.
Where it lives
- Search page:
/search - Search architecture and ranking model:
docs/architecture/SEARCH_ARCHITECTURE.md - Benchmark methodology:
docs/explanation/search-benchmark-methodology.md
Step 02 — Build a research collection
A collection is a named set of judgments. Use it as a working folder for a research question, a comparative-law study, or a batch you intend to run extraction over. Collections are persisted server-side and accessible from the left sidebar.
Walk through the example
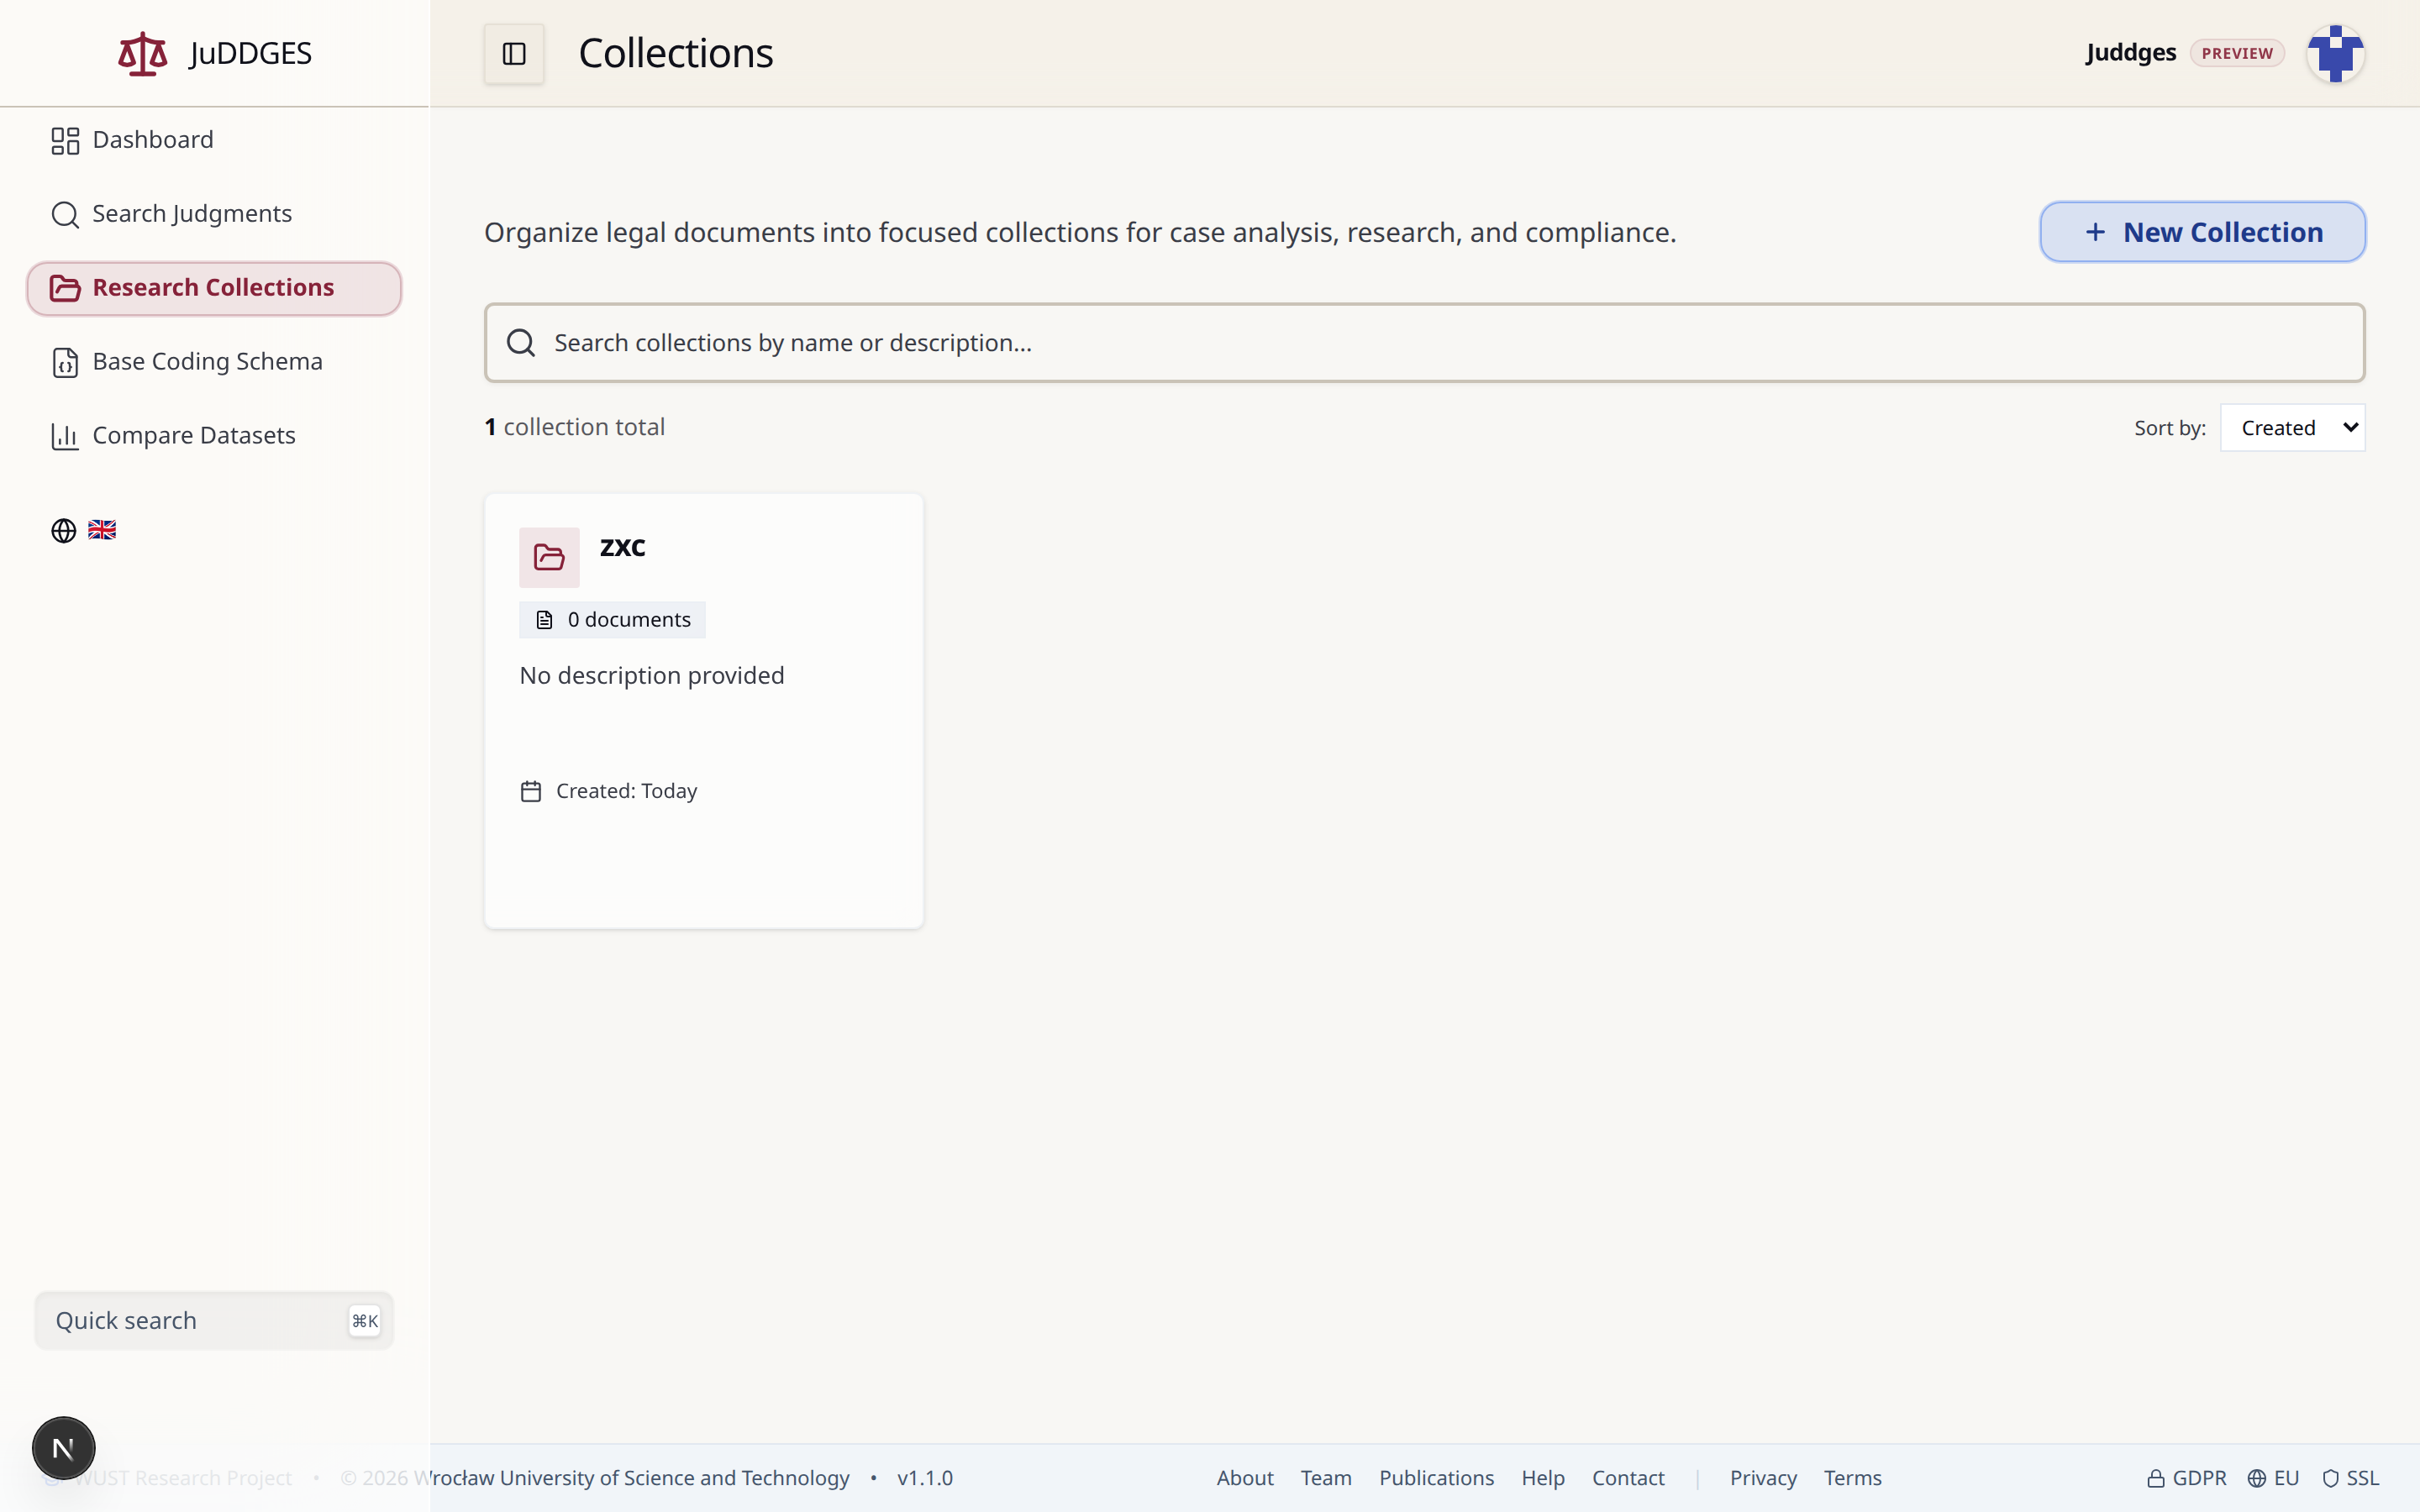
Open /collections. The list shows
every collection on your account with its document count and creation
date.
- Create a collection. Click
+ New Collection(top right) and give it a name. Description is optional and can be edited inline afterwards by clicking the collection name on the detail page. - Add judgments to it. Three entry points:
- From a search result: hover a result card and use the Save to collection affordance.
- From an open document: the document toolbar exposes the same action.
- From the collection detail page: the Add documents button accepts a list of judgment IDs, which is useful for importing curated sets.
- Search and sort collections. When the list grows, the search box above the cards filters by name and description, and the Sort by dropdown switches between Created and Updated timestamps.
- Open a collection. Clicking the card lands you on its detail page — a sortable, filterable table of the judgments in the set, with bulk actions in the toolbar.
Workflow patterns
- Per-question. One collection per research question. Add anything potentially relevant during exploration; trim down at the end.
- Comparative. One collection per jurisdiction for the same fact pattern. Run identical searches under each filter, save to the matching collection.
- Pre-extraction. Build the collection first, then point an extraction job (see Step 04 on the base schema) at it. Collections are the canonical input unit for extraction pipelines.
Where it lives
- Collections list:
/collections - Collection detail:
/collections/{id} - API reference (programmatic access):
docs/api/API_REFERENCE.md
Step 03 — Read the base coding schema
A coding schema is the field list an extraction job will produce —
the columns of the eventual table. The Base Judgment Extraction
Schema (universal_legal_document_base_schema) is the canonical
reference: 51 fields covering case identifiers, parties, court
hierarchy, dates, legal grounds, and outcomes, with parallel English and
Polish descriptions.
Walk through the example
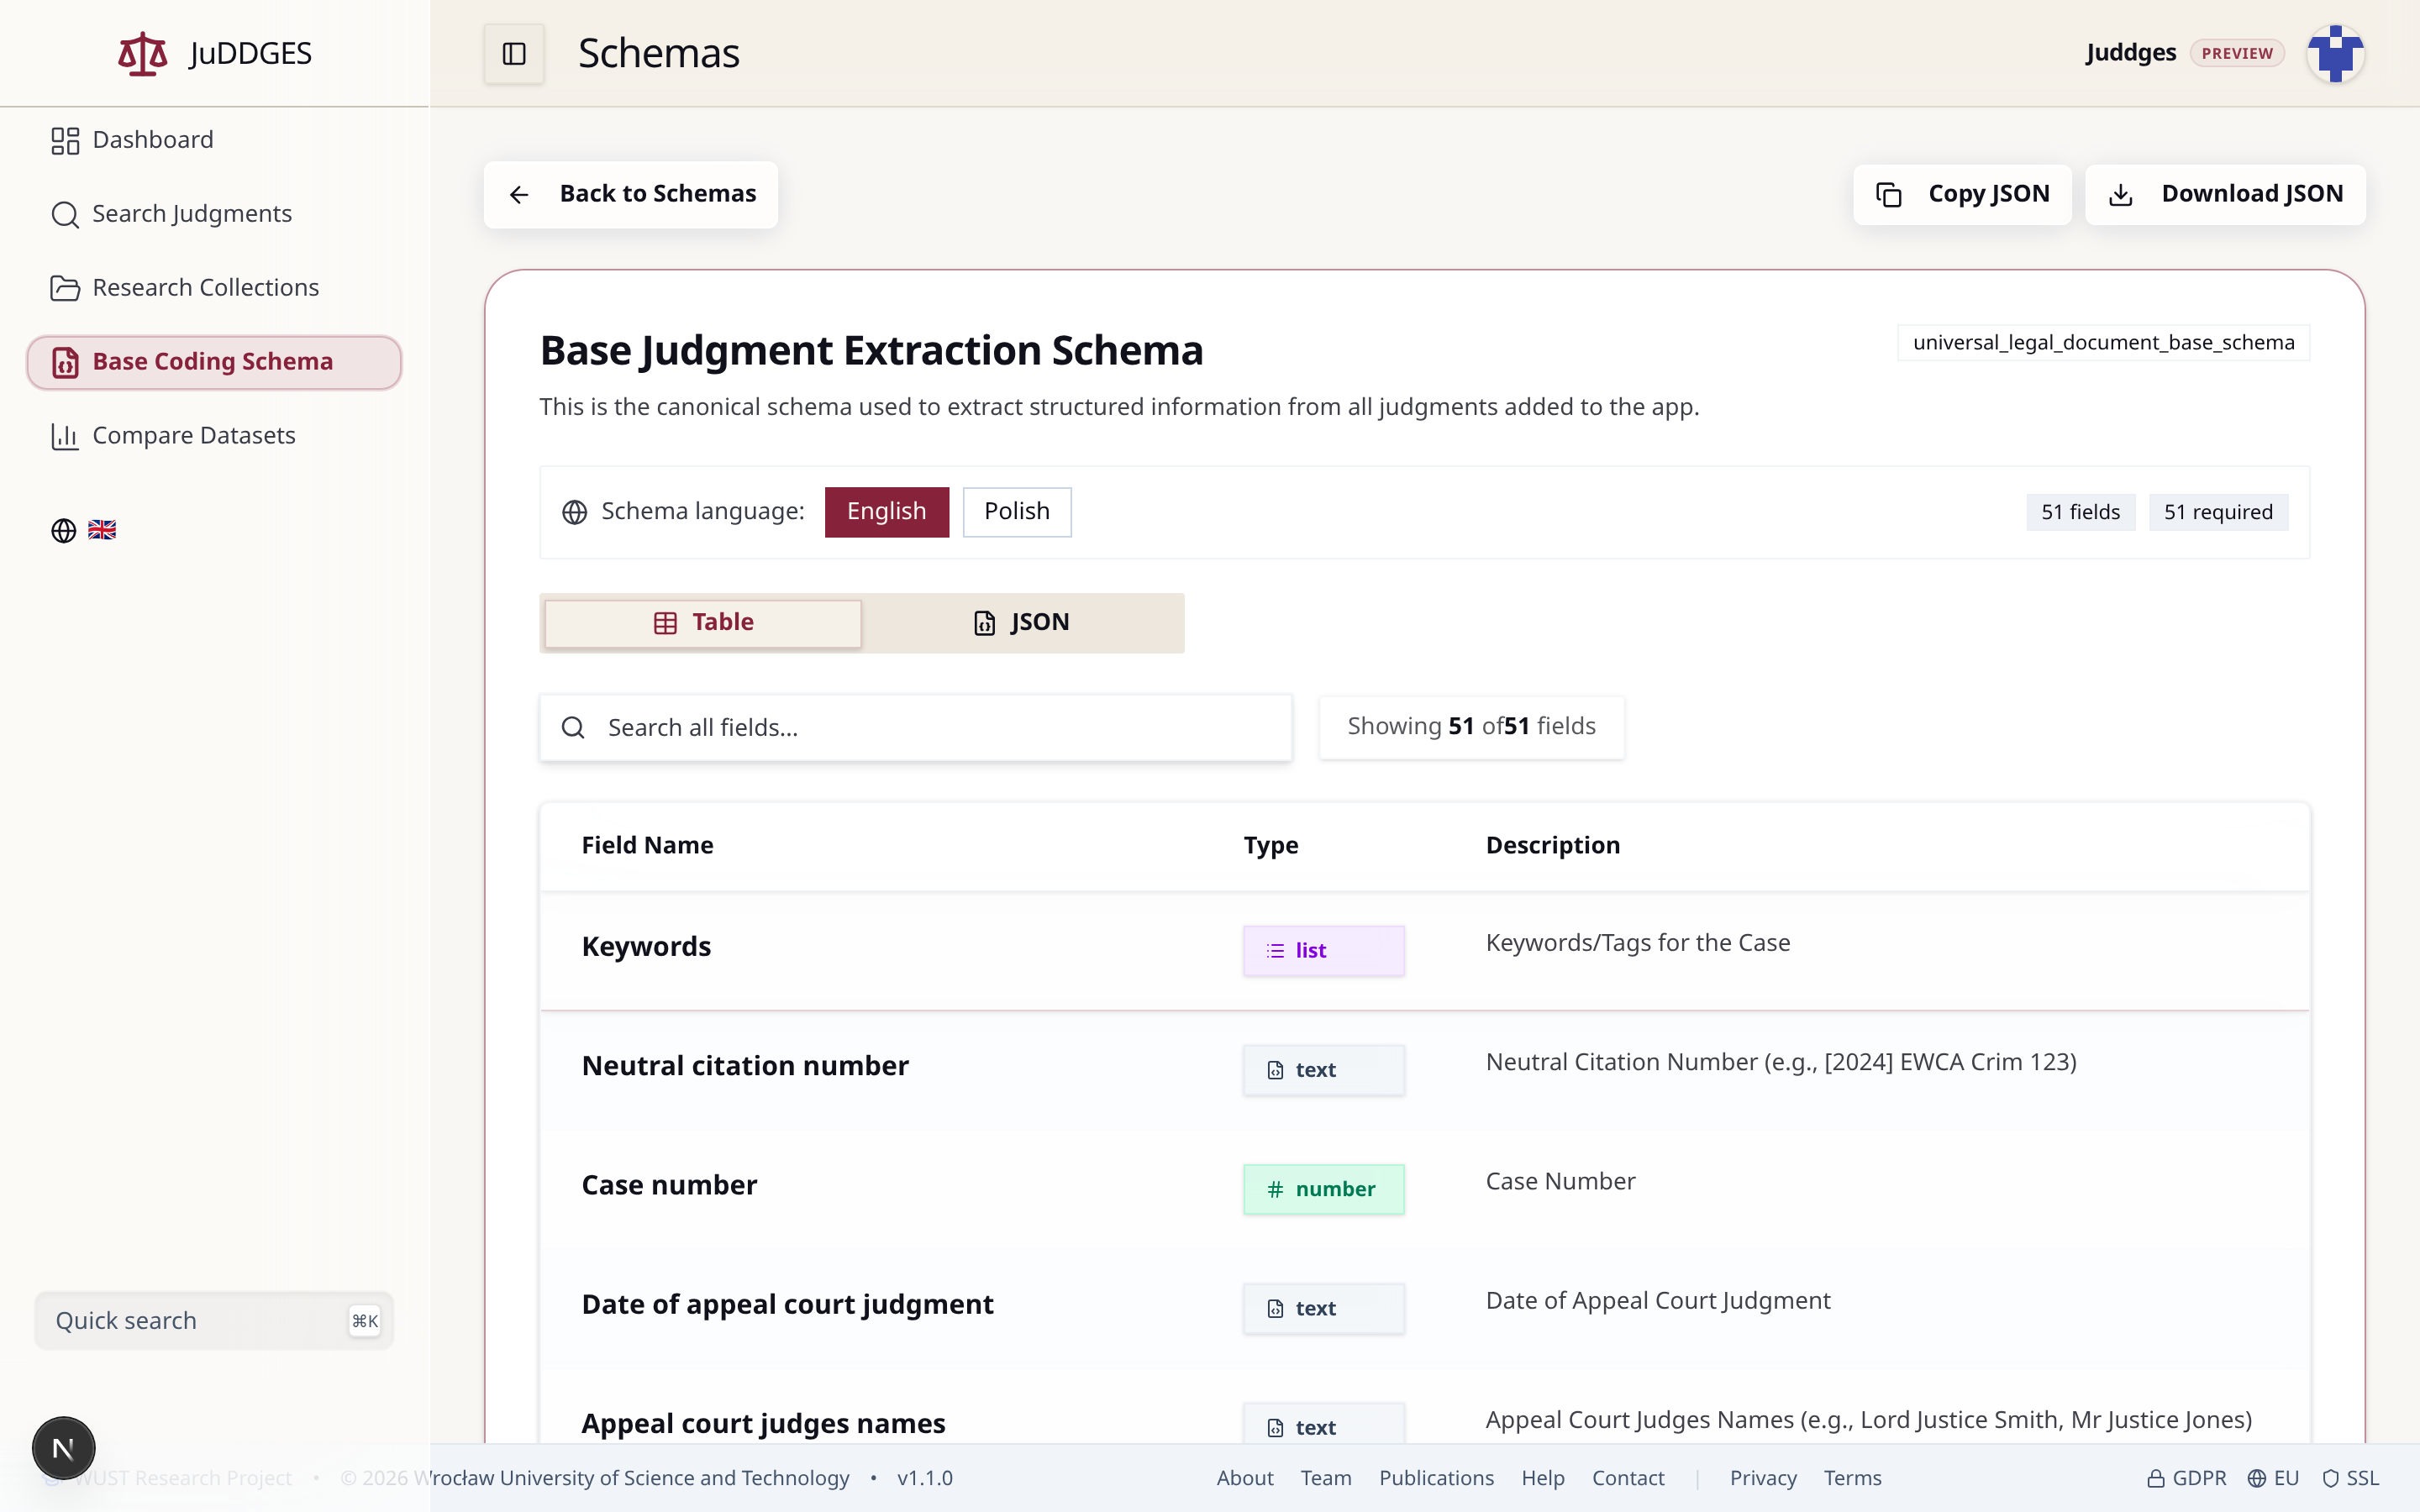
Open /schemas/base.
- Read the header. The
universal_legal_document_base_schemaidentifier is the canonical name used everywhere — JSON exports, API responses, indexing in Meilisearch. The51 fields · 51 requiredbadge tells you every field is mandatory in the base profile. - Switch the language. The Schema language toggle swaps every description between English and Polish. Field keys themselves stay stable; only the human-facing strings change.
- Search the fields. The Search all fields… box filters the
table by field name, type, or description. Try
"date"to see every date-typed field, or"judge"to find judge-related fields across the appellate, lower, and panel levels. - Inspect a row. Each row shows the field name, its type
(
text,number,list,boolean,enum), and its description.enumfields enumerate their allowed values when expanded. - Switch to JSON. The JSON tab shows the same schema in its raw JSON-Schema form. Use the Copy JSON or Download JSON buttons (top right) to take a copy with you when designing a derivative schema.
When to extend versus reuse
- Reuse the base schema if your research question is well-covered by the existing fields. Doing so makes your extracted data joinable with everyone else's — the whole point of having a canonical schema.
- Extend it (add fields on top) when your question needs domain-specific fields the base doesn't have. Keep the base fields unchanged so your output remains forward-compatible.
- Avoid forking from scratch unless you have a reason that doesn't fit either of the above. A clean fork severs the join.
Where it lives
- Base schema page:
/schemas/base - Coding-scheme usage guide:
docs/how-to/CODING_SCHEME_USAGE.md - Polish dataset curation (real-world application of the base schema):
docs/how-to/polish-dataset-curation.md
Next steps
- Want to extract structured data from your collection? See the Coding Scheme Usage how-to (extraction routes are currently hidden from the sidebar but reachable by URL during the preview phase).
- Want the corpus-wide view? Open
/statistics. - Found something missing or confusing? File feedback via the in-app feedback panel or open an issue on GitHub.
Regenerating the screenshots in this tutorial
The PNGs referenced here are produced by a Playwright script:
cd frontend
npm run docs:screens                   # regenerate all
npm run docs:screens -- dashboard      # regenerate one step
The script logs in via the real Supabase auth UI using
TEST_USER_EMAIL / TEST_USER_PASSWORD from .env, walks each step, and
writes PNGs to frontend/public/docs/onboarding/. The same files are served
to both this tutorial and the in-app /onboarding route, so they never drift
out of sync.